
This guide gets into some more advanced WordPress work but you should be fine if you follow the directions. Make sure you backup your website first just to be safe though.
Installing the Google Tag Manager (GTM) to your website takes 5 easy steps. You can click the step to skip to that part since many of you will likely be able to skip steps 1 and 2.
1. Install the X Child Theme
I’m assuming you already own the X Theme and have a valid license for it. You’ll need to login to their members area and then you can download the X child theme.
I recommend downloading it rather than creating a child theme yourself because you install their child theme from the “Appearance” menu in the backend. It’s exactly how you would install any other WordPress theme. Plus the subdirectories are already created for you too!
2. Access your site via FTP
FTP is an abbreviation for for “File Transfer Protocol.” It’s a way to move files from your computer to your server.
I use WinSCP as my FTP client. It’s free and I’m used to it but I’ve also seen Filezilla (also free) get recommended a ton. These tools allow you to visually manage files on your server without having to do it through the command line.
If you neeed it, here’s a decent video on how to use WinSCP.
When you login to your server via FTP you will need to know the username and password to your server. If you don’t know this information, you can get it (or reset it) from your web hosting provider.
Once you’re in your FTP, navigate to your WordPress installation. Where this is located will vary depending on how/where you installed WordPress on your server.
If you’re using ServerPilot on a Digital Ocean droplet like we’ve recommended elsewhere, then your WordPress installation will be at:
root/srv/users/serverpilot/apps/your-app-name/public
The “serverpilot” directory may be a different user name if you used something other than the default. The “your-app-name” directory is self explanatory: it’s the name you used when you installed WordPress on ServerPilot.
3. Copy/Paste the _header.php file to your child theme directory
The file that you need to make a copy (don’t delete the original) of is called _header.php and (assuming you’re starting from your WordPress installation directory) it’s located in this directory:
wp-content/themes/x/framework/views/global/_header.php
In your FTP, copy (again, don’t delete the original file) that file to your desktop (or wherever) and then go to your child theme directory and paste it there. This is the directory the file should be in now:
wp-content/themes/x-child/framework/views/global/_header.php
Now edit the copied file (the one in your x-child directory) and leave that window open because we’ll be pasting a GTM code into it in the next step.
4. Paste your GTM tracking code into functions.php and _header.php in your child theme
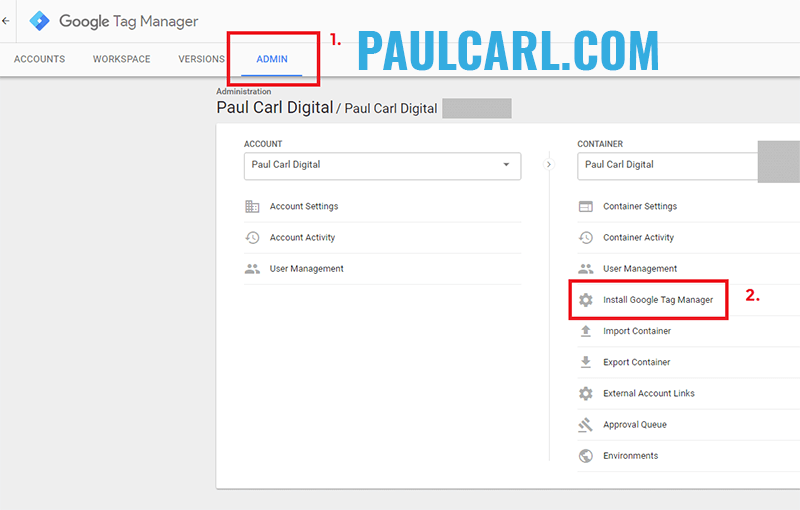
The GTM code comes with two parts: one that should be pasted as high in the tag as possible and another that should be right after your opening body tag. To find this code, you’ll need to log in to your GTM account (or create it), click on the “Admin” tab, then click on “Install Google Tag Manager” as shown in the screencap below.
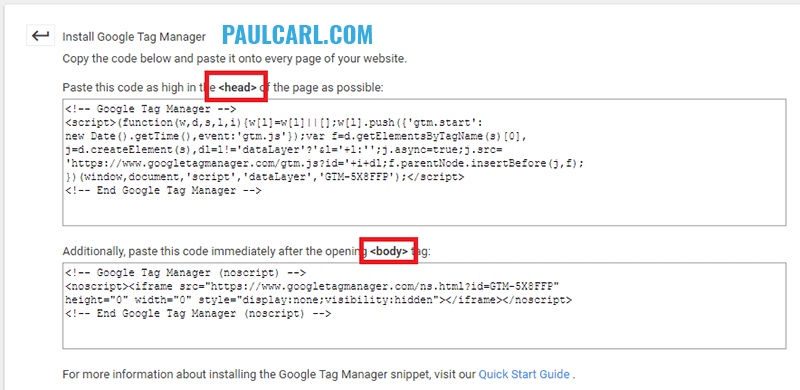
Next you’ll see the screen below with your two code snippets.
First let’s take care of the head code, the snippet in the top box. Go into your WordPress dashboard and under the “Appearance” navigation click on “Editor.”
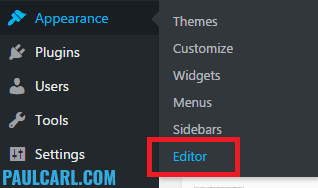
On the top right of this page, make sure you have the “X-Child Theme” option selected in the drop down menu. Look at the screenshot below if you’re not sure.
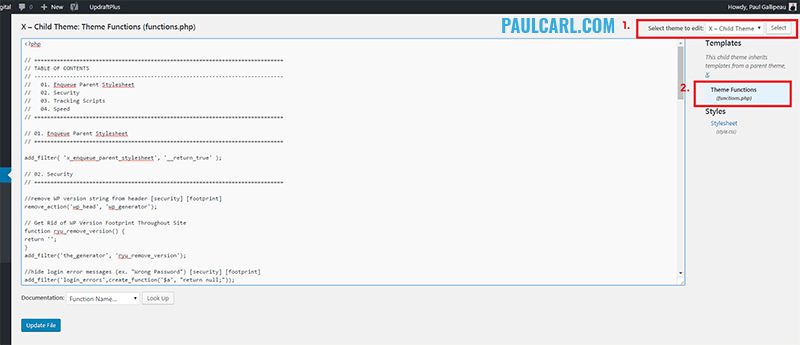
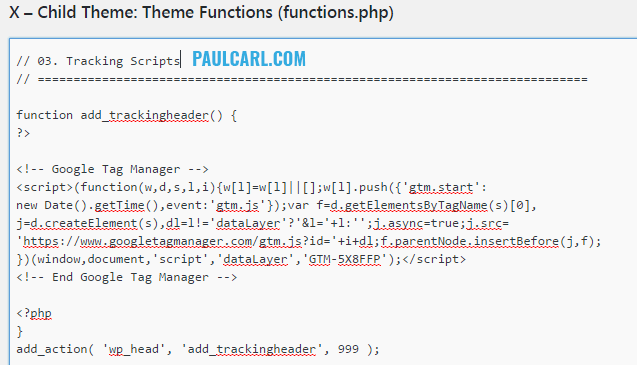
Your functions.php file will have different code in it than mine because I’ve added a lot of code to improve WordPress speed and security. The first code to copy and paste is below.
function add_trackingheader() {
?>
<!– Replace this line with your GTM code –>
<?php
}
add_action( ‘wp_head’, ‘add_trackingheader’, 999 );
Below is an image of what mine looks like with my GTM code.
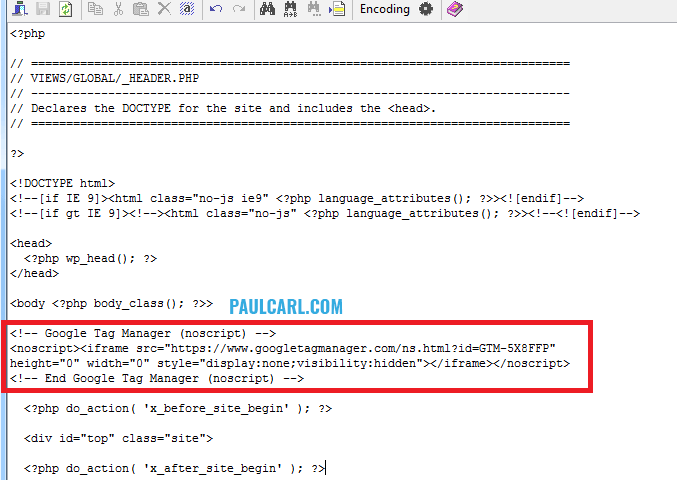
Now it’s time to paste the second half of your GTM code. Open up the window of your copied _header.php file from your child theme directory and paste your second snippet of Google Tag Manager code below the body tag, just like how you see mine in the image below.
5. Test your GTM installation to make sure it’s working
For this portion, you’re going to need to add your first tag to the GTM. Adding Google Analytics is a great first step. This video will show you how if you’ve never done it before. You’ll need your Google Analytics ID handy.
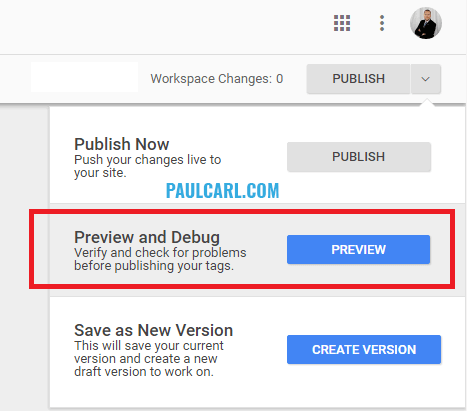
Once you have your Google Analytics tag setup, go to the preview mode before you publish. The option is in the top right corner of the interface as shown in the screencap below.
Once preview mode is enabled, open your website in another tab and you should see a Google Tag Manager overlay on your website like the one in the image below. This means that everything is working and you can publish it!

Now the real fun begins and you get to start playing with all of your tags. 😃

I’m always open to questions, feedback, and guide requests. You can also hire me to do this for you if want to delegate the work. Let’s talk!